Validate Spreadsheet Data Entry Errors
After selecting the spreadsheet, all spreadsheet data is validated to ensure it adheres to the rules. These rules are set forth by Autodesk®, requiring that all projects added progammatically to BIM 360® or ACC conform to the defined specifications and requirements. As described in in the topic, Enter the Spreadsheet Data, these rules are entered in the Instructions sheet of the spreadsheet template. After selecting the spreadsheet, and before the project selection grid appears, one or more dialog boxes will appear describing any validation errors that were detected.
Validation errors are grouped by error type. All errors for each validation type are presented together in the dialog box that appears, describing the error that occurred along with the location within the spreadsheet.
Except for Invalid Heading errors, spreadsheet rows containing one or more validation errors are removed, and all template rows that successfully passed all tests appear in the project selection gird, ready to be selected and added as new BIM 360® or ACC projects.
However, before any validations are performed, the system first checks to see if the correct format template has been used.
Outdated Template
Since the earliest releases of the application, Naviate Cloud Manager has always used a spreadsheet template. Prior to version 2.5.10.11, it contained 22 columns (A-V) and contained a single heading row.
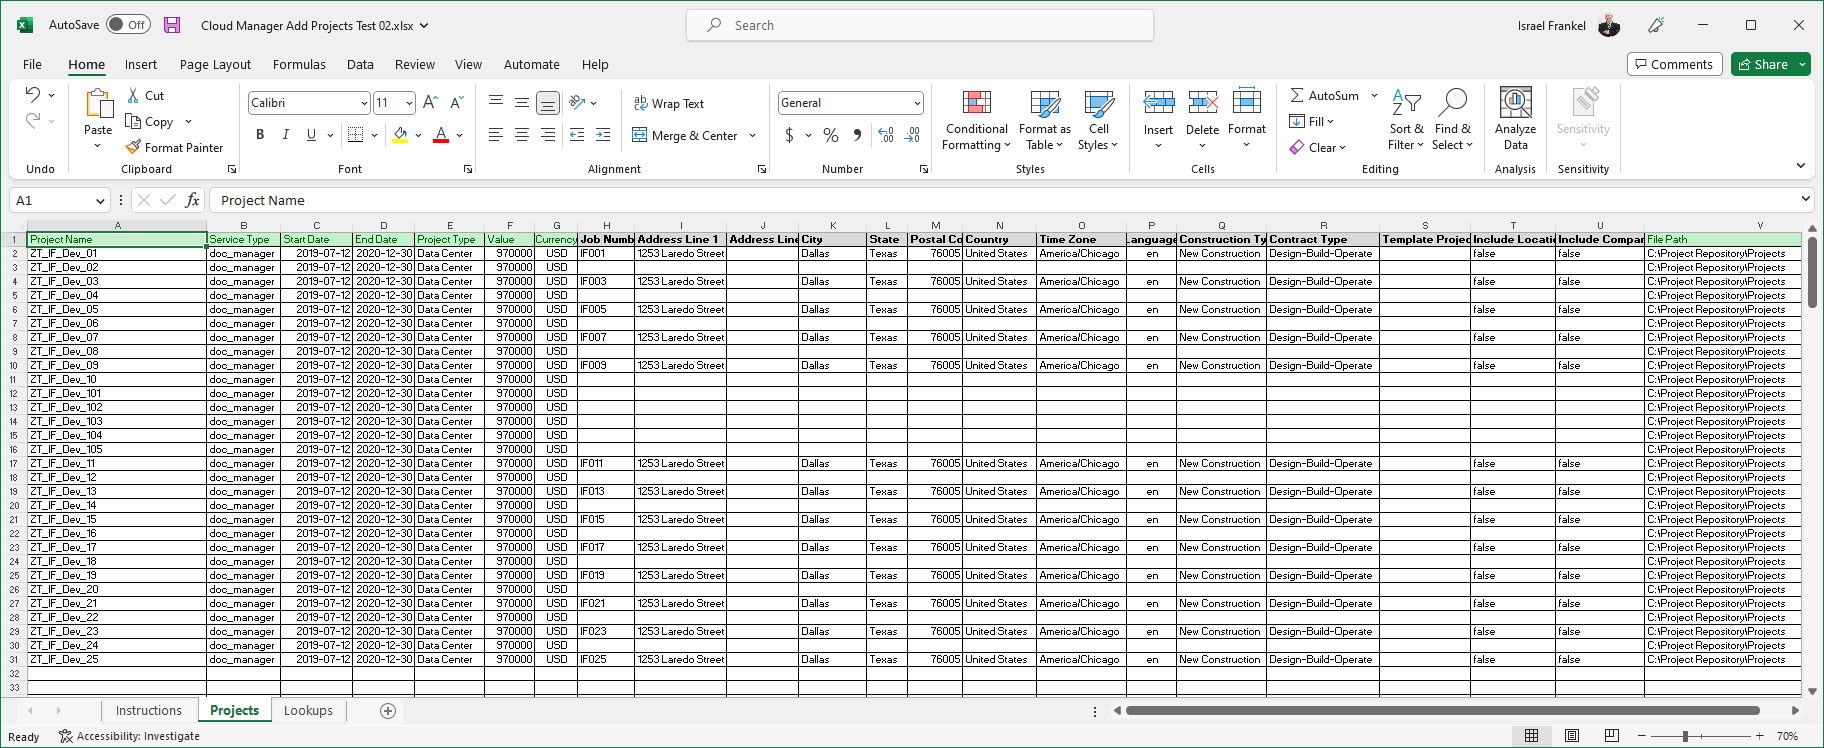
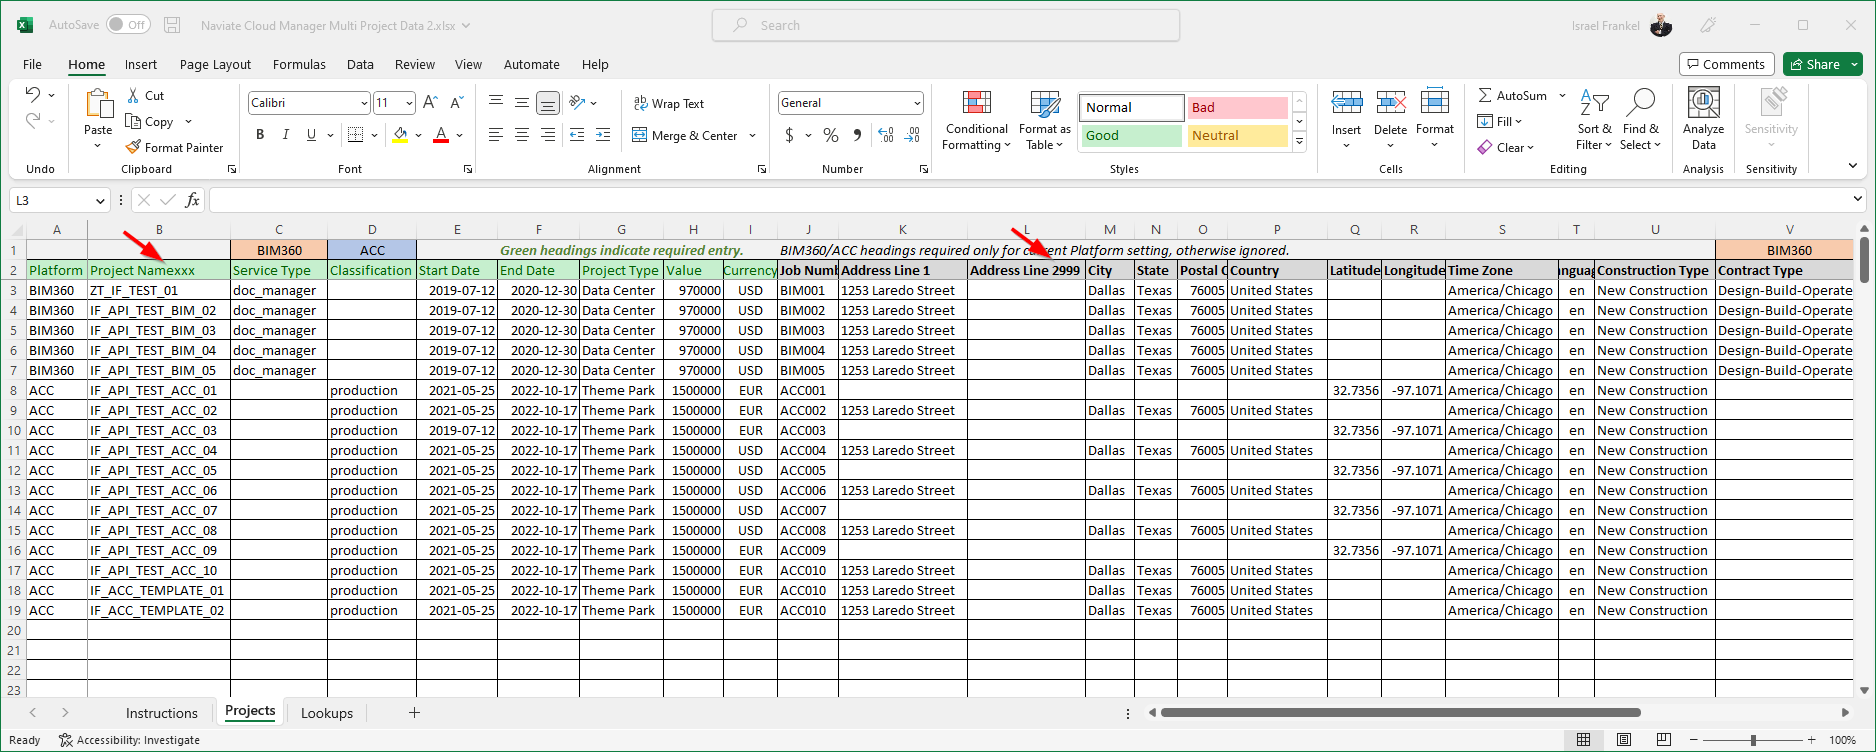
As of the introduction of version 2.5.10.11 — featuring support for adding Autodesk Construction Cloud (ACC) projects — the template was expanded. This was necessary to both support the ACC-specific options, and to assist the user in understanding and using the new format.
As part of the release of this new spreadsheet template, the ways in which a new, empty template can be acquired have been expanded. Previously, the only way to get a new template was to copy it from the application distribution file. While the file is still available in this manner, it can now also be acquired by downloading it from the Projects screen. Additionally, it can even be downloaded directly from this documentation.
Important Tip — Refer to Migrate Previous Spreadsheet Entries to ACC-Compatible Template for help moving any existing spreadsheet template entries from the old format to the new one.
To assist the user by guaranteeing that only the correct format spreadsheet will be processed and to prevent the possibility of errors, when spreadsheet template is selected from the projects screen, various tests are performed to ensure the correct format template has been used. If the previous format spreadsheet has been entered, the following message is displayed.
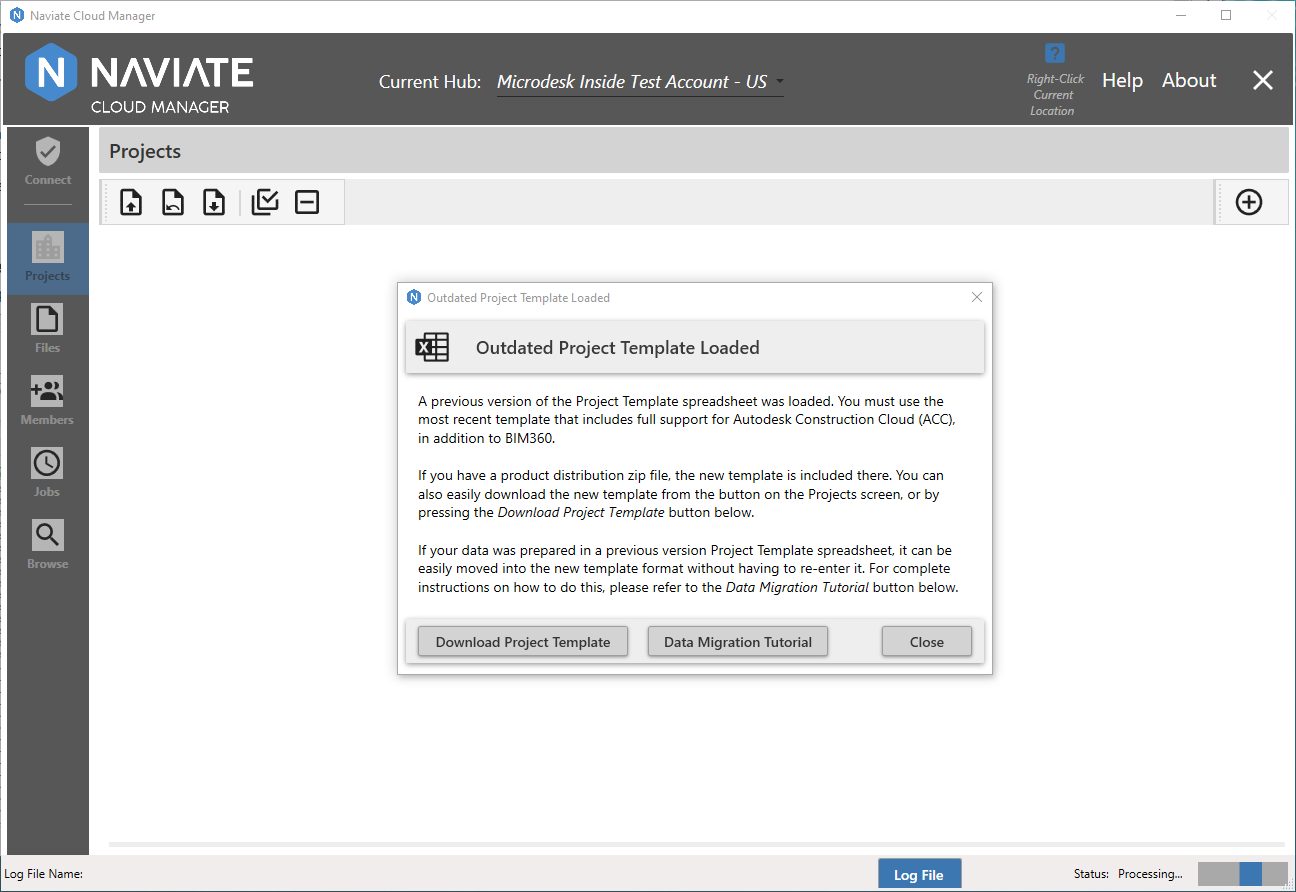
In addition to a full explanation of why the selected project template spreadsheet has been rejected, the window also provides two helpful buttons. The first, ![]() , provides yet a fourth way to obtain a new project template in the correct format. The
, provides yet a fourth way to obtain a new project template in the correct format. The ![]() provides direct access to the Migrate Previous Spreadsheet Entries to ACC-Compatible Template link referred to in the preceding tip.
provides direct access to the Migrate Previous Spreadsheet Entries to ACC-Compatible Template link referred to in the preceding tip.
Invalid Headings
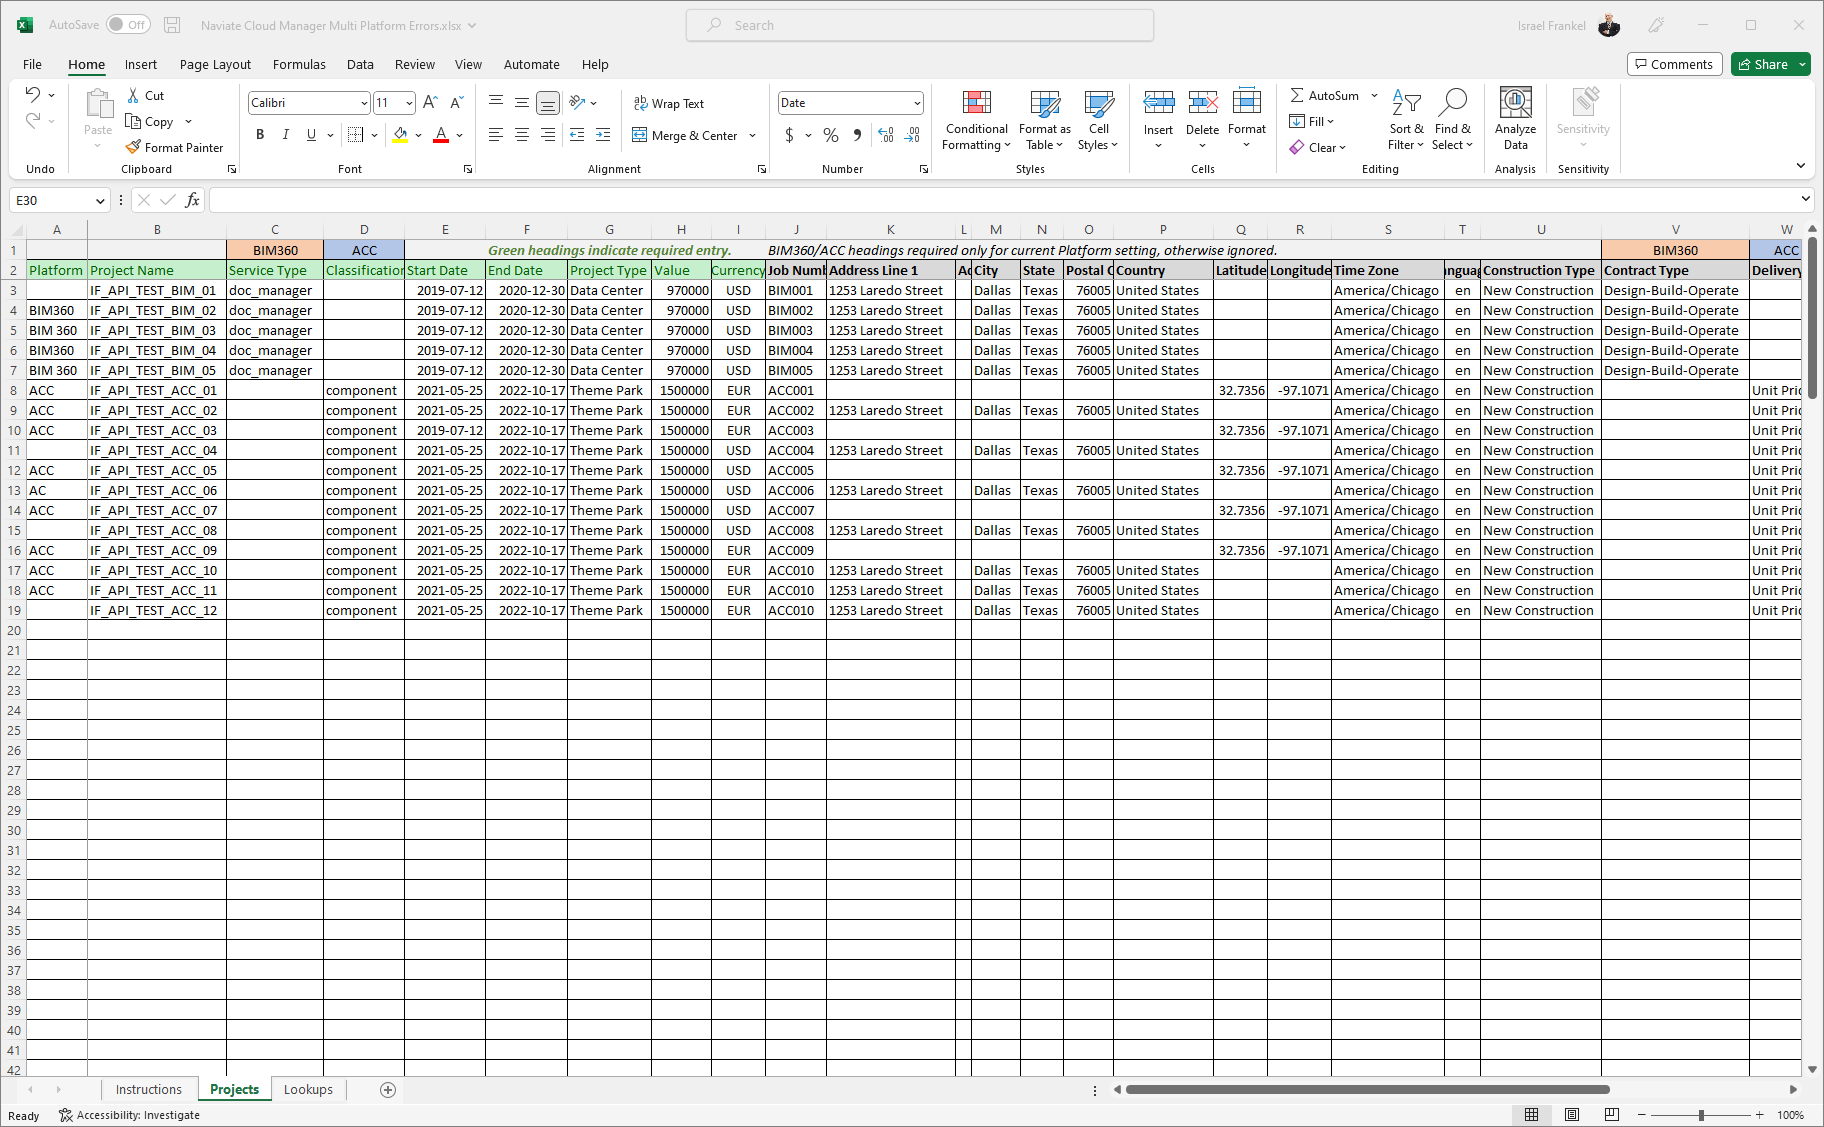
The first step in the process is preparing the spreadsheet template, defining all projects that are to be created.
Source Spreadsheet A — Contains Header Entry Errors
Once the spreadsheet is complete and has been saved, it is selected to load the data directly into the Naviate Cloud Manager project selection grid.
After the spreadsheet has been loaded — but before any data appears in the project grid — the data validation tests are performed. The first test performed is the Invalid Heading test. This ensures all template spreadsheet column headings are in place, are in the right order, and contain the expected names.
If any errors are found, the following dialog appears:

The Invalid Heading Error dialog window, shown above, clearly states the heading rules. Additionally, it provides an exact description of the errors detected, where they were found, what they should be and what the current entry contains.
After pressing the Ok button, the dialog disappears and the user is returned to an empty project selection grid, as shown below.
Invalid Heading Errors differ from Validation Errors in that one or more of these errors will prevent any projects from loading. All other types of data entry errors, as we will see below, simply remove the project containing the errors and allow all other projects to load.
Invalid Project Platform
There is a second test that occurs before the suite of Validation Errors (see following section) are performed. The first row of the project template spreadsheet contains the project Platform type.
Source Spreadsheet B — Contains Invalid Platform Errors
Entry of the project platform is required for each and every row in the spreadsheet. Further, it must exactly match the expected format. The expected format is as follows:
- BIM360
- ACC
Otherwise, if anything other than these two values are entered, the system will reject the entire spreadsheet, displaying the following message:
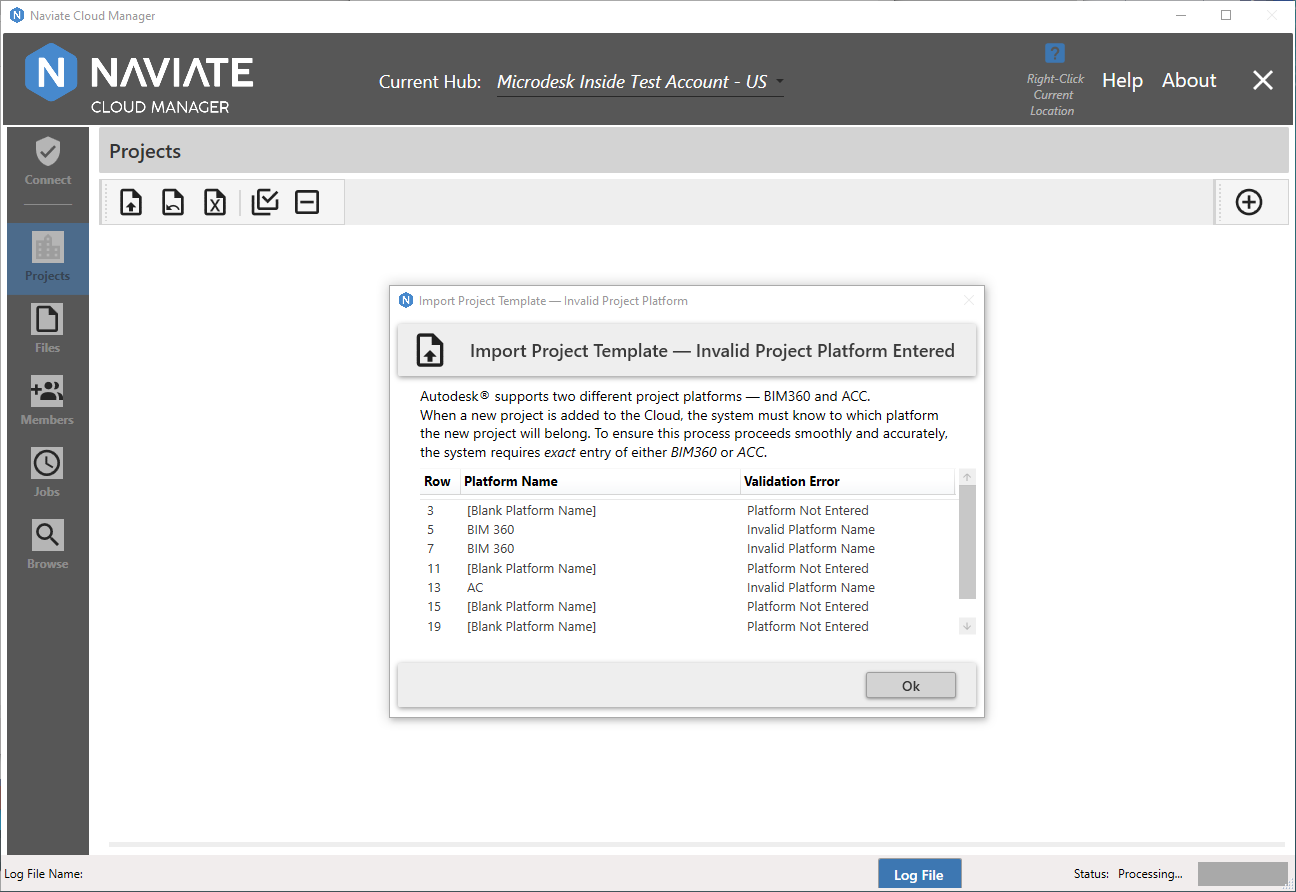
Included with the error notification is information describing on what row the error occurred; the invalid platform name that was found there; and the exact nature of the error — either Platform Not Entered (i.e., a blank entry) or an Invalid Platform Name.
Please Note — For an invalid entry to be made here, the original data in the spreadsheet as received from Symetri will have had to have been altered. This is because the default is for there to be a dropdown list containing the only two valid entries for the field.
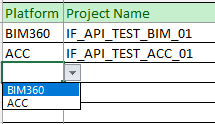
If this dropdown list is not present it means it was overwritten in some way. To remedy, locate the original spreadsheet and copy the fields back to the spreadsheet presenting the problem then select the correct entry.
Data Validation Errors
The data validation errors described here differ from Invalid Heading Errors and Invalid Platform Errors (described above), in that these errors are removed from the list of defined projects — allowing all projects contained in the project template spreadsheet that pass all validation tests to be loaded into the project selection grid. Of course, the spreadsheet data itself is not affected, allowing the user to go back and edit the spreadsheet to address all errors encountered and repeat the process.
Once the spreadsheet data has been entered and saved, it is ready to be selected from Naviate Cloud Manager.
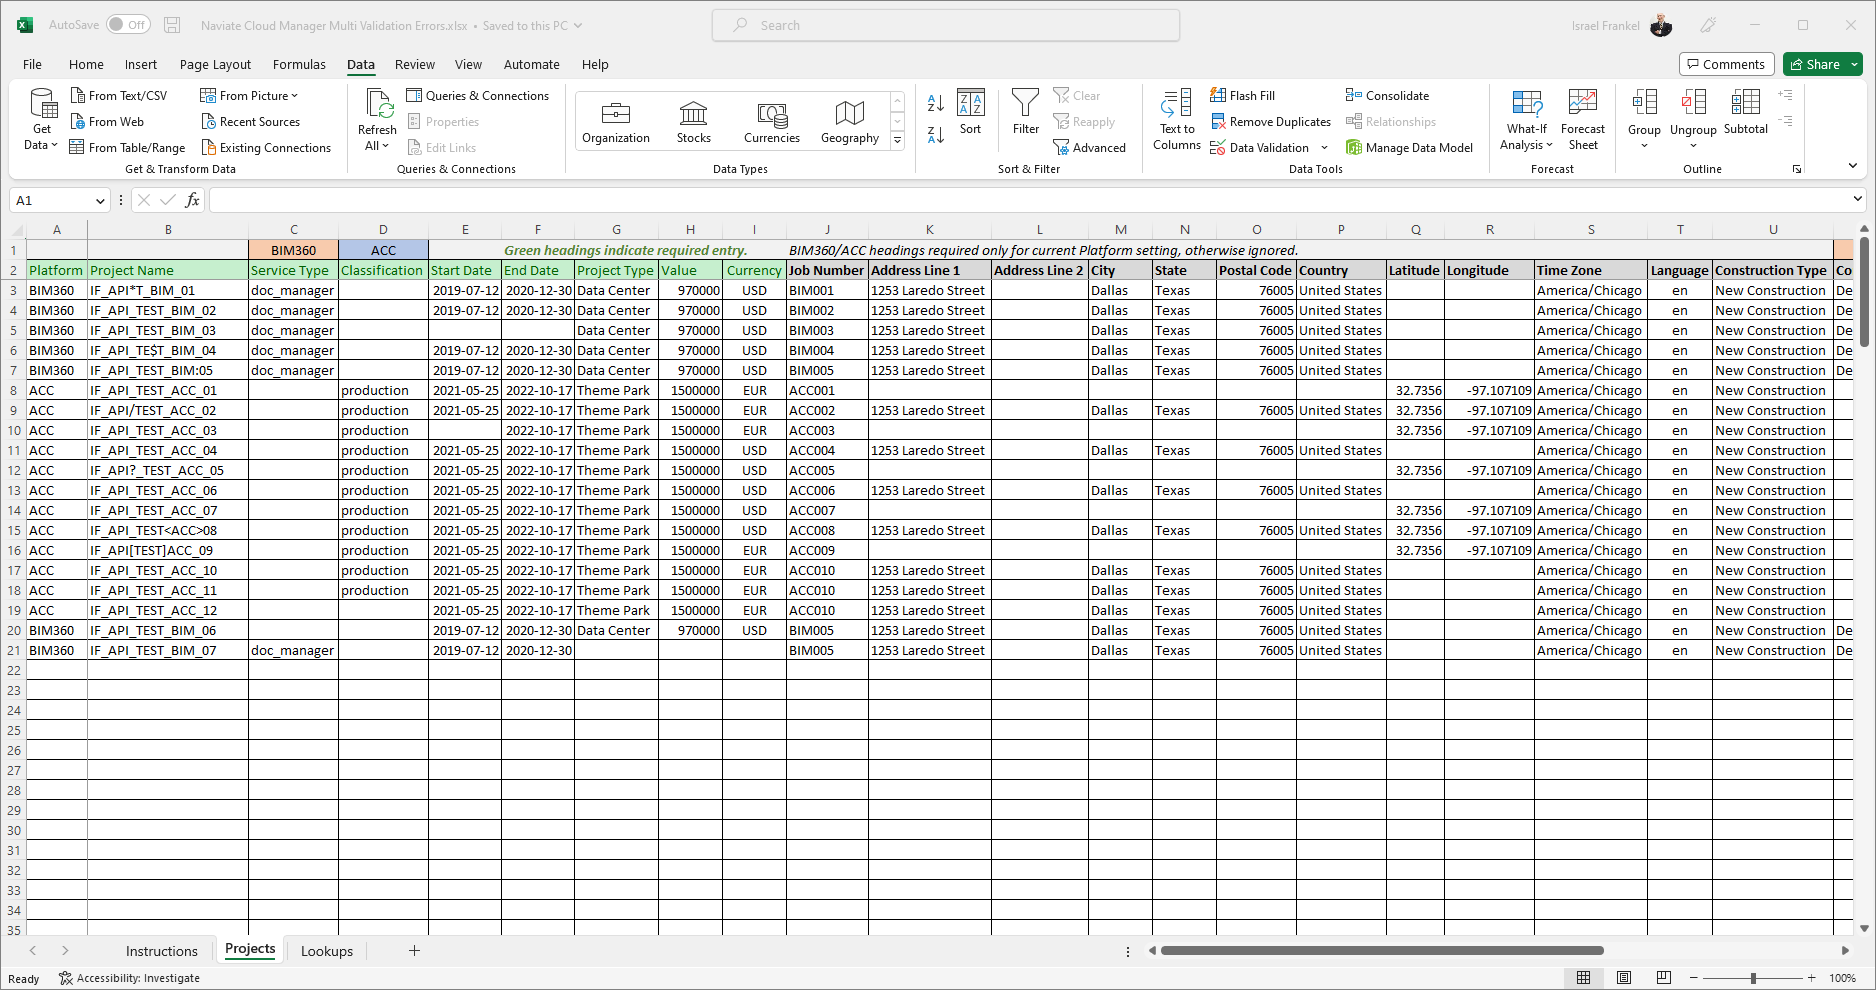
Source Spreadsheet C — Contains Validation Errors
After the prepared spreadsheet (above) has been selected from Naviate Cloud Manager, all validations are performed. If no validation errors occur, the project selection grid appears and the user is ready to proceed with selecting the projects prior to adding them to BIM 360 and/or ACC.
However, if any data entry validation errors have occurred, then a dialog window appears describing the problem. There are several different types of message window, each addressing a specific data validation problem. If more than one of these error types is encountered, each message window appears one after the other, as described in the following.
Invalid Project Name
In addition to the project Name being a required field (represented by the * in the Autodesk® documentation, shown below), it limits the project name length to a maximum of 255 characters. Further, it prohibits the entry of certain characters when defining the project name.

Autodesk Platform Services Documentation — Post Project: name
If any of these requirements are not adhered to by one or more of the project names entered in the template, the following message appears:
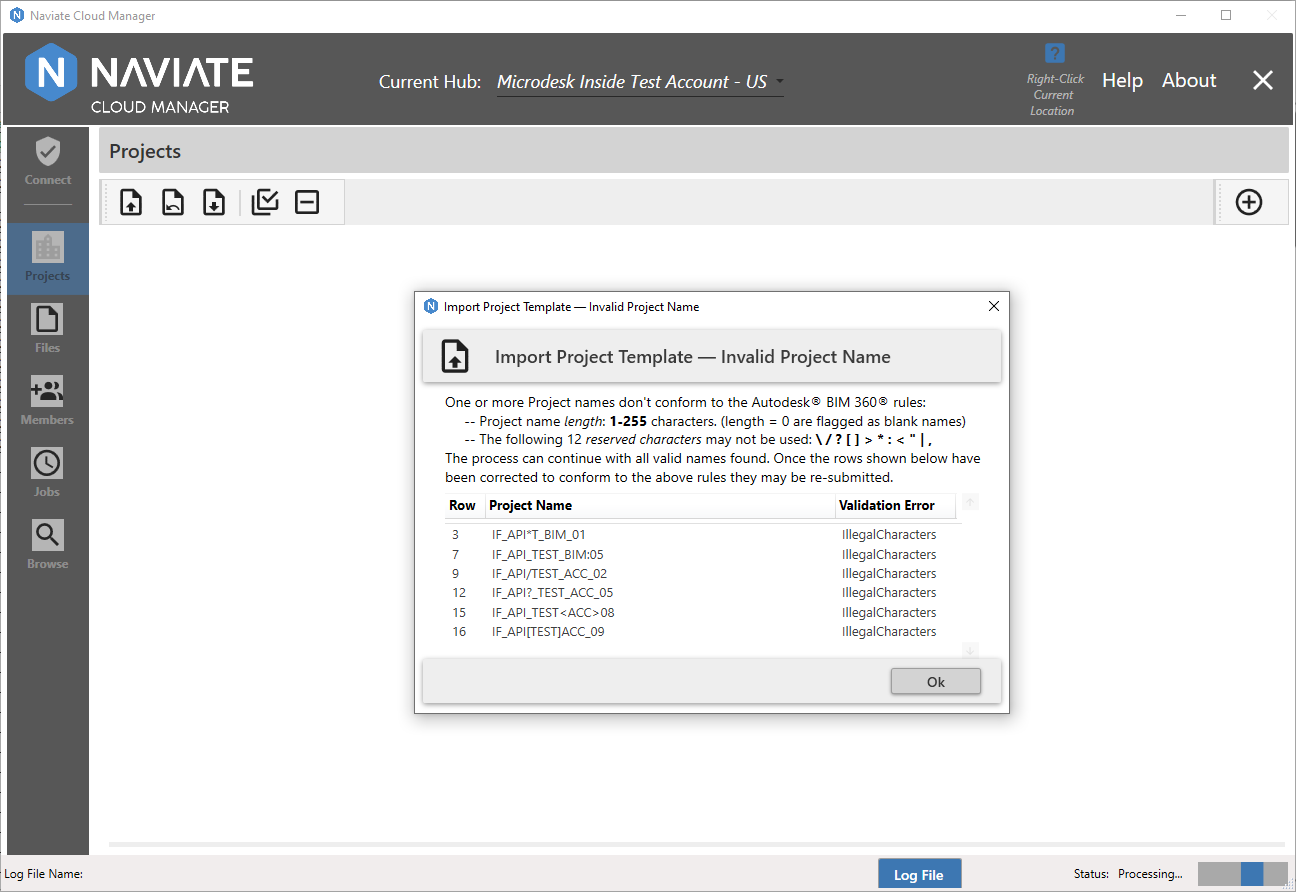
As shown above, the message states the requirements and shows all occurrences of entries that deviate from the specifications. It clearly states the spreadsheet template Row in which it occurs, the Project Name entered, and the Validation rule that has been violated. The intention here is to provide as much information as necessary for the user to address the problem and load the template again.
Invalid Project Dates
Project Start and End dates are both a required fields (represented by the * in the Autodesk® documentation, shown below). Additionally, the Start Date must precede the End Date. The project template spreadsheet cells containing these two fields are both properly formatted, so any date entered in these cells will automatically conform to the format requirement stated below.
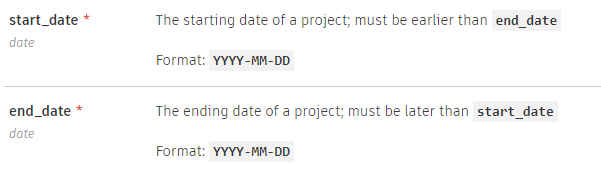
Autodesk Platform Services Documentation — Post Project: start_date and end_date
If any of these requirements are not adhered to by either of these dates, the following message appears:
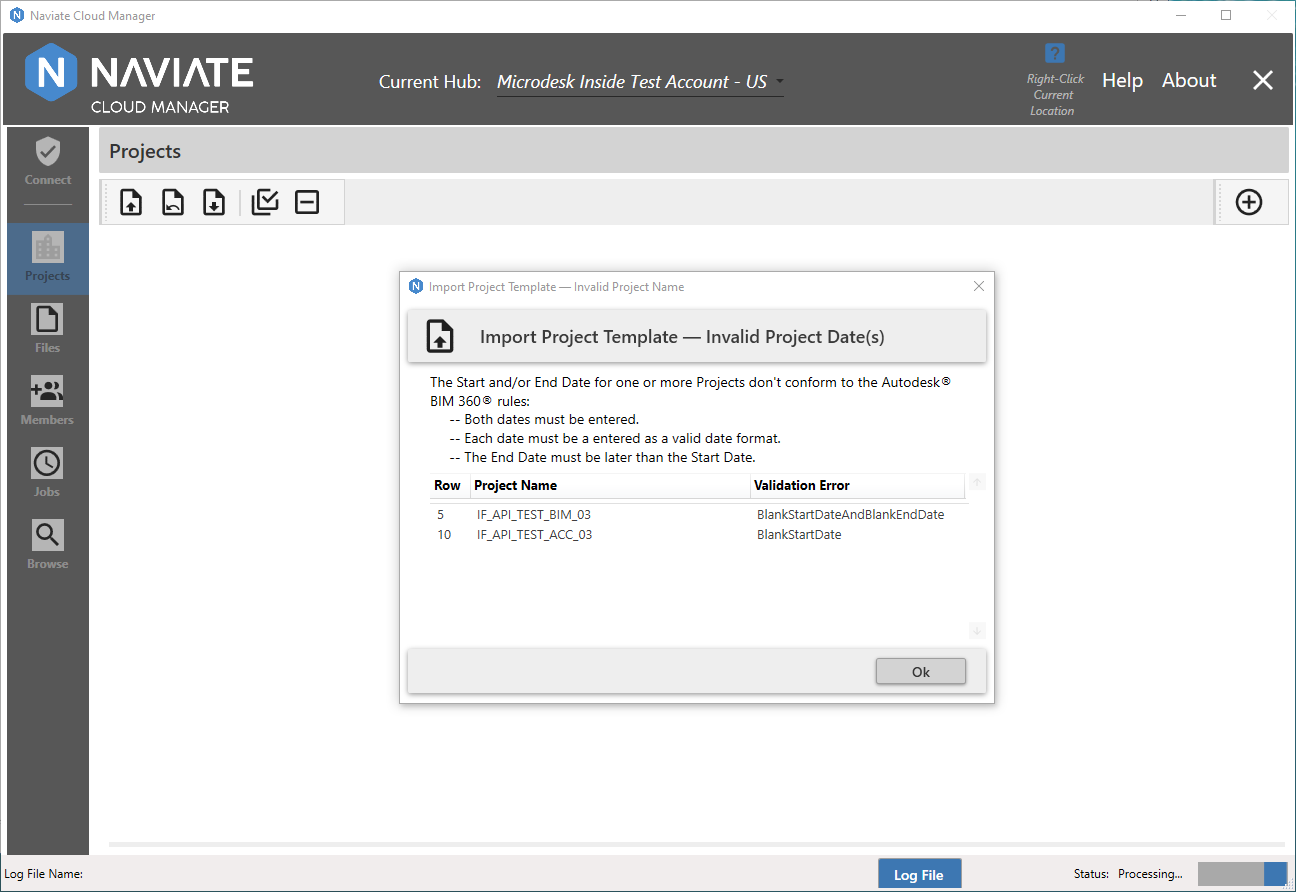
As was the case with the Project Name validation described above, the message clearly states the requirements and shows all occurrences of entries that deviate from the specifications. It clearly states the spreadsheet template Row in which the problem occurs, the Project Name entered, and the Validation rule that has been violated. As always, the intention here is to provide as much information as necessary for the user to address the problem and load the template again.
Blank Entry in Required Field
If entry is omitted for either of the preceding validations — project Name or Start and End Date — it is reported as part of the comprehensive validations performed on those fields. All additional required entry fields are validated by the operation described here. As with the preceding validation described above, the required entry requirement is represented by the * in the Autodesk® documentation.
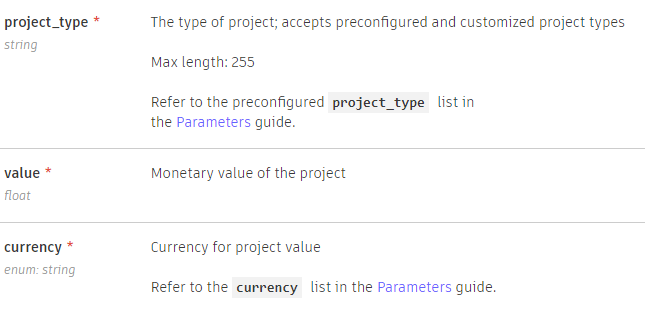
Autodesk Platform Services Documentation — Post Project: project_type, value, and currency
The Parameters guide referred to by the Autodesk Platform Services documentation is provided by the dropdown lists contained in the project template spreadsheet.

This means all that is necessary to ensure conformity to the requirements for both project type and currency is to select from the dropdown lists provided. To satisfy the entry requirement for project value, any entry at all must be provided, include zero.
In addition to the project type, value, and currency fields described above, there are three other fields requiring entry — the BIM360 Service Type, ACC Classification, and File Path.
BIM360 Service Type is required only when defining an ACC project and Naviate Cloud Manager currently supports only one option for BIM360 Service Type. Therefore, Document Manager is the only choice provided in the template dropdown list.
Likewise, ACC Classification is required only for ACC projects. It currently supports the an entry of component, which is contained in the cell dropdown list.
Finally, File Path is used internally by Naviate Cloud Manager. When a project is added to BIM 360® or ACC by Naviate Cloud Manager it, it saves project information in it's data store for later use. Included in that information is a local file path that serves as a parent directory for each project that can contain folders and files to be uploaded to BIM 360® and ACC via the Files module. To support projects that were not created with Naviate Cloud Manager, or if it is necessary to move the location of this local file repository, the application provides the Update Project DB, Create/Copy Local Folder Repo functionality, located in the Browse module.
If any of the preceding requirements are violated by the fields just described, the following message appears:
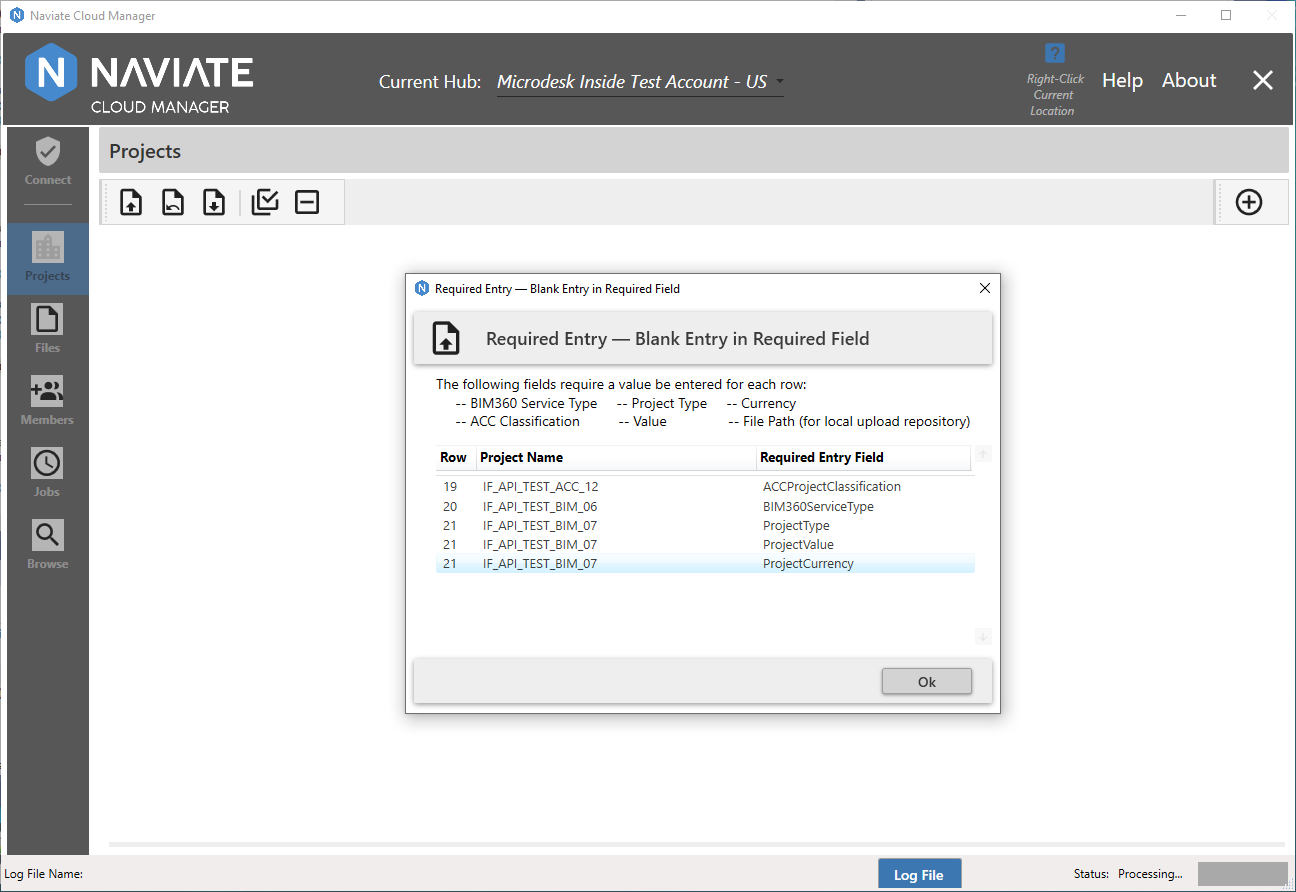
The above message states the problem and shows all occurrences of entries that do not conform to the requirement. It displays the relevant spreadsheet template Row, the Project Name entered, and the Required Entry Field where the rule has been violated. The goal is to make it fast and easy for the user to address the problem and load the template again.
Invalid ACC Data
ACC projects have their own specific set of requirements for entry. The user may enter a Product list or a project Template Id — however, they may not enter both. Likewise, if they enter and project Address, they may not enter a Latitude and Longitude for the project. By Address, we refer to any one the following — Address Line 1, Address Line 2, City, State, Postal Code, and Country. By Latitude and Longitude, we refer to either Latitude or Longitude. However, it is important to note that neither Address nor Latitude/Longitude must be entered.
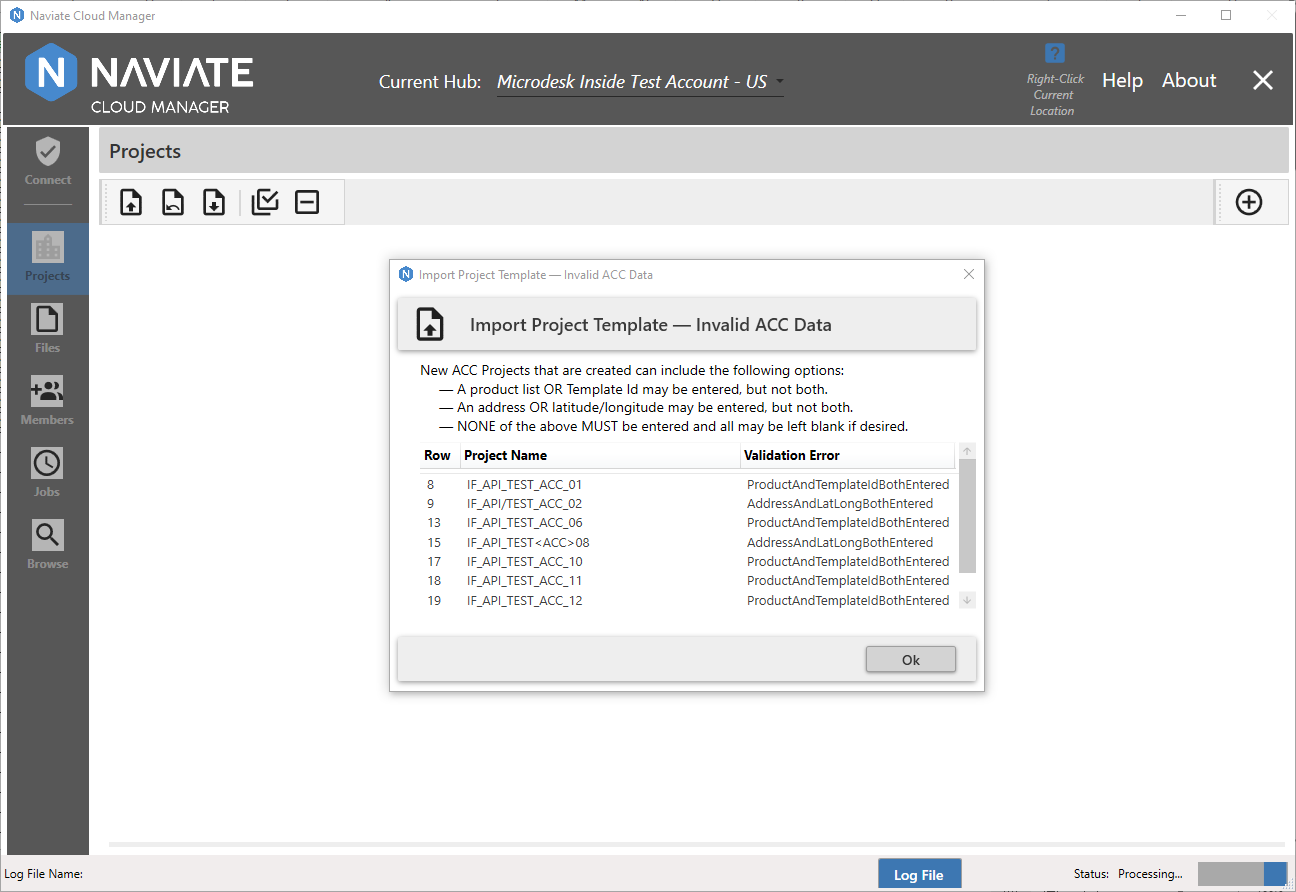
As usual, if any row of the template violates an ACC requirement, a dialog box is displayed showing the usual information. It clearly states the validation rule being applied, the location in the template where the violation occurred, and the precise nature of the violation.
Finally, after all validations have been performed and all messages displayed, the project selection grid appears.
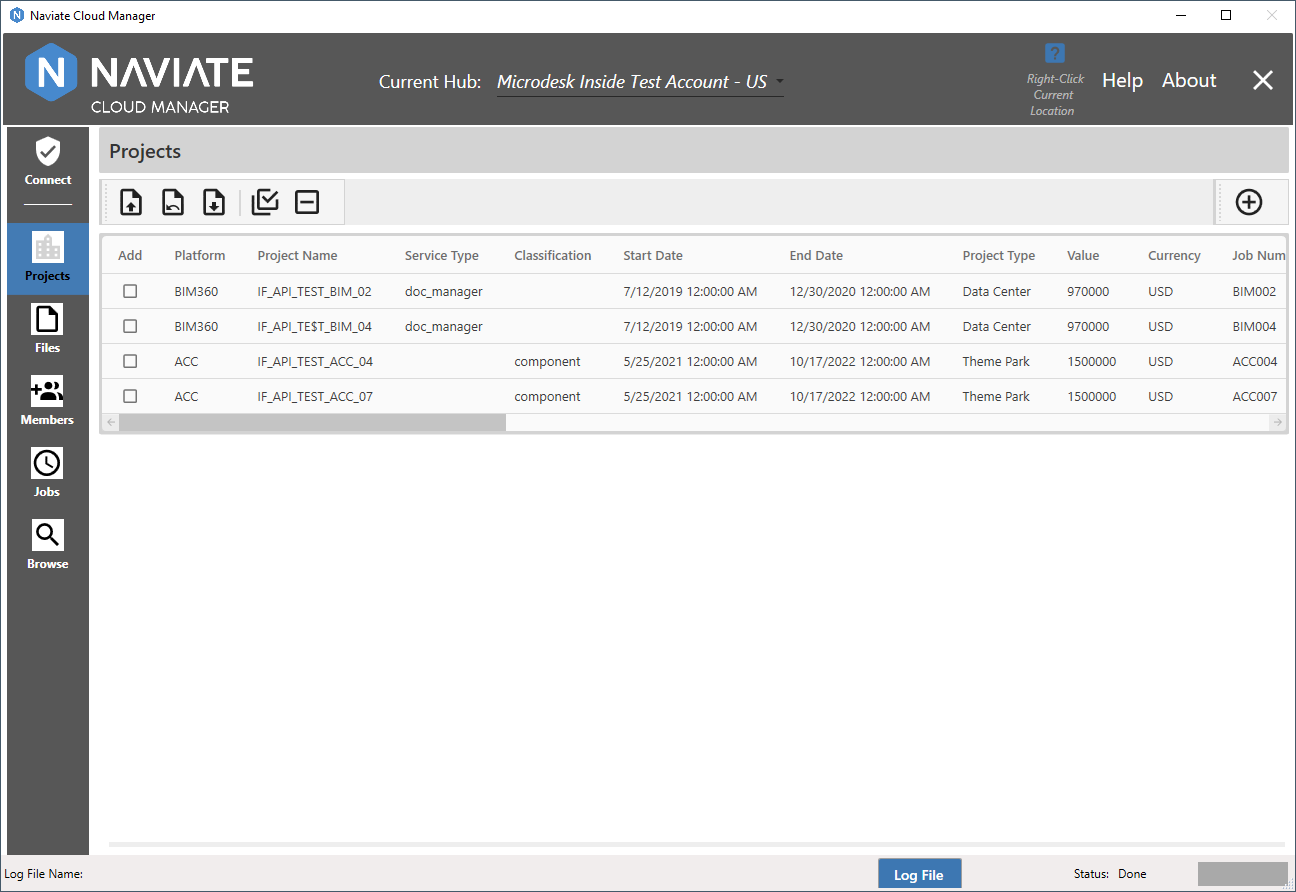
If you compare the above project listing to the data entered in the Source Spreadsheet C shown above, you will notice it contains far fewer rows. This is due to Naviate Cloud Manager removing all rows that fail validation from the project selection grid. In other words, if the user selects a spreadsheet and no messages appear and only the populated grid is shown, they can be confident that all rows passed validation and are ready to be selected for addition to BIM 360® and ACC.