Export NWC
With the help of the Export NWC command, the Revit user can export multiple 3D views to Autodesk Navisworks Cash file format (.nwc) in one click.
Starting The Command
In Revit:
- In the ribbon, navigate to the BIMrx tab >> BIMrx Core panel >> Export NWC command:

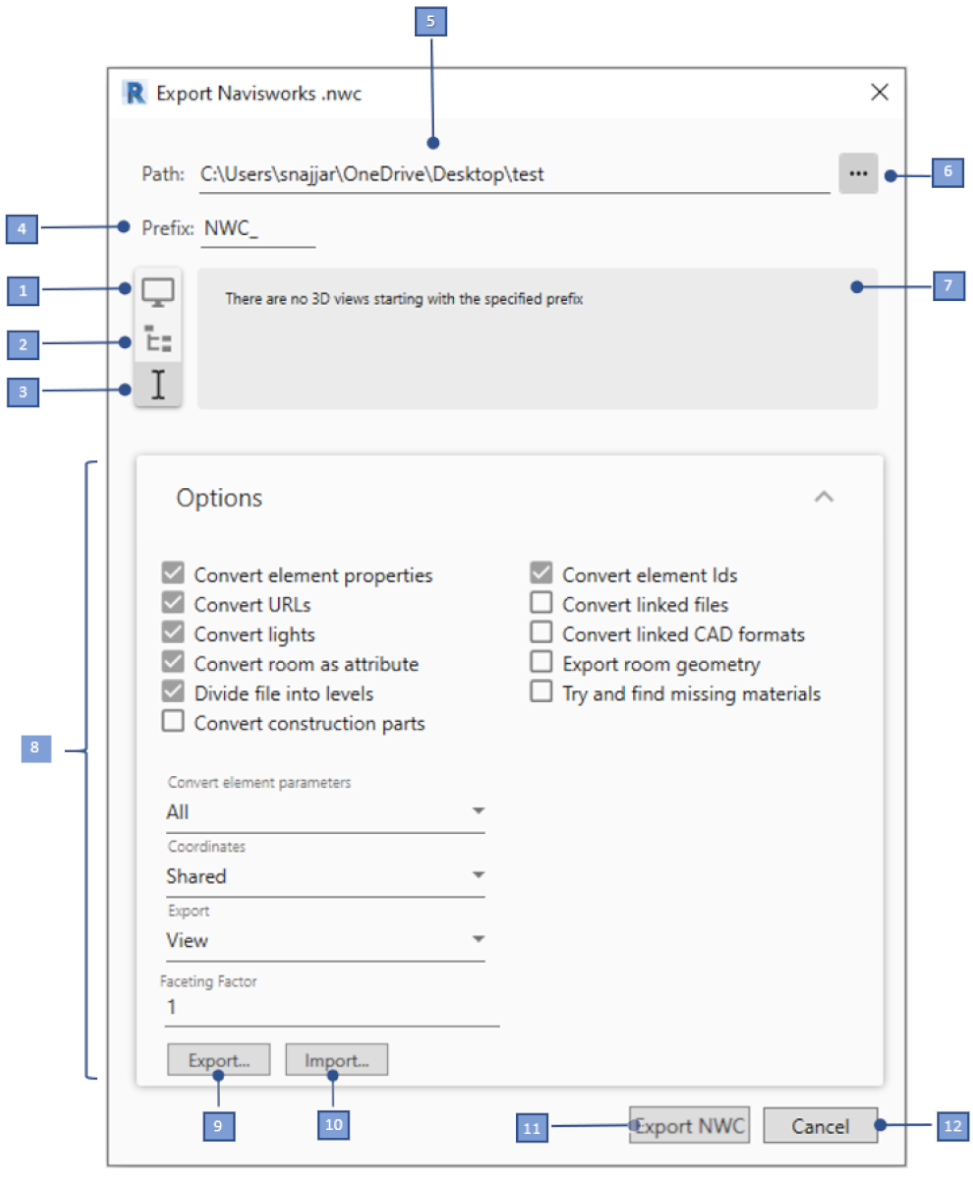
- You will be presented with a dialog with options to select the 3D views to be exported along with the export path and the internal Navisworks exporter options:

Export NWC Dialog interface:
- Export Active 3D View toggle. If the active view is not a 3D view, the info panel will report that, and the Export button will be inactive.
- Export Selected 3D Views in The Project Browser toggle: If there are no selected 3D views in the project browser, the info panel will report that, and the Export button will be inactive.
- Export 3D views with names starting with a Prefix toggle: If there are no 3D views with names starting with the prefix defined in (4) the info panel will report that, and the Export button will be inactive.
- Prefix field
- Path field: Here you can input the desired file saving destination, if the path is not defined, the Export button will be disabled.
- Browse button: Displays a folder select dialog to update the Path field.
- The Info Panel displays information about the files to be exported depending on the selected option, it also indicates if there is any missing information or errors.
- Navisworks Export Options Panel: This panel displays the export options for the internal Navisworks exporter. These options will vary slightly depending on the Revit version. These are the same options found in the Navisworks Revit file reader options page (see Autodesk's Navisworks Help Documentation)
- Export... exports the current settings to a XML file that can be imported into other Revit models
- Import... Imports a previously exported settings file.
- The Export NWC button will dismiss the dialog after exporting the selected views to the specified directory. The exported files will have the same names as the views. The selected options will be saved to the Revit model for easy retrieval.
- The Cancel button will dismiss the dialog without exporting the files nor saving the options.
Notes:
- Selected views in the project browser that are not 3D Views will be ignored.
- The settings Import... and Export... functionality is compatible with the Navisworks Revit file reader options exported from Revit's native NWC export options dialog, however it is not compatible with XML settings files exported directly from Navisworks, as the two formats are natively not compatible.